Pages

Sunday, June 24, 2012

DIY Metallic Letters

Big news in the de Jong household! We're going to be parents again...to a teen girl...from the Netherlands! One of our goals for our new house was to host an exchange student. We're working with CIEE, and have been matched with a Dutch girl who seems to be a great fit for our family. She'll be arriving at the end of August and stay here throughout the school year. 

I've been having a lot of fun getting her room ready. I don't have a lot of opportunity to do girly, as I live with two boys. This is what the room looked like after I found a brand new Target lamp at a garage sale:

I was trying to think of something fun to put above the bed. I liked the idea of putting her name up, since that what we did in D's room.

I found some white letters at JoAnn's. A few of the letters were rather scuffed. I'm not a good painter, so I was trying to figure out how to pretty them up.

I remembered something I saw a few years ago at a model home. The letters of a child's name were covered in aluminum foil. I liked the idea of silver letters because of the way they reflect light and the colors in the room, but I didn't think the foil was very neat. Then I remembered that I had picked up some metallic contact paper on a clearance rack several months ago.

I wasn't sure if it would work, so I sampled with the back of a letter. I removed the protective part of the contact paper, and laid the letter down on the sticky side. Then I roughly cut around the letter. 

The contact paper attached well. I learned that any dust or say, a price tag, would make the seal uneven, so I mostly remembered to wipe each letter down first.

I used an exacto knife to cut the excess contact paper away. It was really easy once I folded down the paper around the letter.

I really like the shine and subtle texture of the contact paper.

And done!

The letters will sit inside a Ikea Ribba photo ledge. We'll hang it up once we buy her nightstand and can center the bed correctly.

I love the way the letters reflect the colors in the room.

A few more pictures of her room.


Stay tuned for more photos of this room as we add a small desk, bookshelf, and nightstand.

***Linked on House of Hepworths and Tuesday's Treasures.

Grass!

If you look very carefully, you can see what's growing in our backyard.
Add caption

Saturday, June 23, 2012

Landscaping Progress: Now with grass!

You might ask youself - if you happen to follow this blog on a regular basis - what happend with the lawn. We had 3 days of great progress (and accompanying posts) which ended with the post on day 4 called... nope... 'We have Shrubbery!' Then it got a little warm. Couple of days well into the 90s F/ 30s C was not ideal for putting in the grassy part of the lawn. Couple that with an official drought we seriously thought about putting in a rock garden, Arizona-style... ;-)

Fortunately, the heat wave passed and earlier today we finally got our grass put in. Last week we did put down the grass seed for the back yard, covered it with straw and left it at that. In the front we opted for sod for that immediate 'pop'.

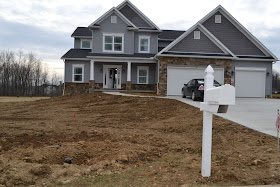
Here's a little history of the lawn progression
Before we build the house...

When we moved in...

Before it was graded... Green, but through weeds...

Graded, just before the shrubs went in...

With the shrubs...
And now finally, four months and five days after we moved in, we can declare that our landscape is done. Now the watering will start to see if we can keep it looking nice...

Voila, Casa de Jong! Now with green in Green!
Thanks to Mike from Sweat Equity Landscaping and our amazing neighbors for their assistance. We couldn't have done it without you.

Tuesday, June 19, 2012

Easy Fruit Popsicles

Since we are waiting out the heat before we can lay down our sod, I thought I'd add a post about how we use our house now that it's done: making sweets and treats! (We also make healthful meals, but this is more fun).

Back in February, when we were busy shopping for all the things a new house needs, D found some popsicle molds and asked if we could get them. At the time, I thought it would make a fun summer project for us. Since he was diagnosed with his milk allergy, I'm grateful that we have the molds so we can make fun, safe frozen goodies for our good boy. 

Since we bought the molds--in February!--D has been asking me to make popsicles for him pretty much every week. In the last couple of weeks, he has asked several times a day! I needed time to find a recipe, and between company and fatigue, I didn't get a chance to do so until this morning. Now I feel bad, because I see how easy a fruit popsicle recipe can be. I improvised this one from one I found here.

Healthy Strawberry Popsicles

Ingredients:
  • 2 cups strawberries, cleaned and cut into small pieces
  • 1/3 cup vanilla coconut milk
  • 1/4 cup honey (next time, I'll use an 1/8 cup)
  • 1 T. chia seeds
  • 1 T. ground flax seed
  • 1 T. wheat germ
Instructions:

First, wash the strawberries. I use a homemade produce wash. I don't leave it on very long because the strawberries are temperamental. Then, rinse with water.


Next, remove the stems and cut strawberries into small pieces. Add them to the blender.

Add the 1/3 cup coconut milk.


Add the 1/4 cup honey.

Add 1 T. chia seeds.

Add 1 T. each of wheat germ and flax seed.

Enjoy the look of joy on your son's face.

Blend well until the strawberry chunks disappear.

Fill up your molds.

 I was able to fill all four small molds, and 1 large mold. Next time, I'll double the recipe. 

Five hours later, we took them out of the freezer and...

Our popsicle turned into a sorbet bowl. My mom suggested that I run the popsicle under warm water before trying to take the top off so that the stick stays intact. In the meantime, D was determined to still enjoy his popsicle.
 All done!

I figured the calorie found on these based on 5 servings per recipe, which comes out to 144 calories each. If you did all smaller pops, you'd be 120 each for 6. If you did 4 pops, you'd have 180 calories each. The large popsicle molds hold just over 1/2 cup. The smaller molds hold about 1/3 cup.

Monday, June 18, 2012

Sod post-poned

We are officially in a drought here in North-East Ohio. We are between 5 and 8 inches below normal. Most lawns in our development are looking quite yellow these days. Fortunately, we got our first rain in quite a while yesterday with a chance of more rain today so we had high hopes for our sod installation which was scheduled for today.

However, at 8am our landscaper called and said that the forecast until Thursday was around 90F / 32C or higher with little or no rain, aka 'no sod today...'

Our lovely 5-day forecast

Next week the weather is in the high 70s, low 80s which means a far better change of our grass to get attached and take root. With the weather being MUCH nicer by Friday - and far less humid as well - we now have our sod delivery and install scheduled for that day.

Sunday, June 17, 2012

We have shrubbery!

Thursday was a big day here at the dream house. Our shrubbery went in! (My computer bit the dust on Friday morning, thus the delay. It took my miracle worker in-home tech guy three days to raise it from the virus death!). And on with the show...

Our landscaper did a fantastic job selecting plants that bring out the colors of our stone, and are also low-maintenance. Take a look.


I love that we were able to bring our angel with us. She reminds us of our lost babies.


Keep in mind, we'll have more to do in the fall when the bulb perennials get planted, but at least the front of the house looks nice now. (And will look even nicer once the sod goes down tomorrow!)

Here's a closer look at the final selections for the front. 
Purple beech tree.
Pretty leaves of the purple beech tree. They really tie in well with our stone. 
Cone Boxwood. There are two of these on the right side of the front walk,  and one on the left.
Purple Sedum. There are two of these, one on each side of the walkway.
Blue Pacifica. There are three of these around the Purple Beech. They'll spread out a bit and cover the mulch area.
Fountain Grass. I wanted some ornamental grass. Our landscaper said this was the least "messy." We have two of these  in the walkway area, and one by our utility poles.
Inkberry bush. We have two of these to the left of the walkway.
Blue Star Juniper. We have three of these to the left of the walkway.
Golden Mop. We have five of these of the left side of the walkway.

Serviceberry. We only have one of these, because it'll grow quite large in the next few years.
In addition to the front walkway, we also have a little mulch and fountain grass around the utilities.


The last thing we did, with the help of our awesome neighbors, was seed and straw that back yard.


We're very grateful for today's rain because our area is currently in a drought. We probably lost a bit of grass in the back where we seem to have a wind vortex, but we're thinking that will be a nice place for some wildflowers. 

One last photo of the house before the sod goes down tomorrow. We're saying prayers for more rain!